1. 버전 관리 시스템
- Version Control System (VCS)
- Git의 데이터는 파일의 스냅샷
2. Git 기초
- Git 기본
- 세 가지 상태
3. Git 명령어
- 3-1. 로컬 저장소 생성 (일반 디렉토리를 git working tree로)
- 3-2. 로컬 저장소를 원격 저장소에 연결.
- 3-3. Staging Area에 파일 올리기.
- 3-4. Staging Area 파일 Commit.
- 3-5. Commit한 파일을 Push해서 원격 저장소로 보내기
- 3-6. Clone : repository에서 코드 가져오기.
- 3-7. 원격 저장소의 수정사항을 로컬로 가져오기 Pull & Fetch
4. branch
- 4-1. branch 생성 및 조작
- 4-2. branch "Joo"에서 작업한 내용을 "master"로 병합.
- 4-3. Git Repository에 로컬 branch push
- 4-4. Github의 branch -> local로 가져오기
1. 버전 관리 시스템
Version Control System (VCS)
파일의 변화를 시간에 따라 기록하여 과거 특정 시점의 버전으로 다시 불러올 수 있는 시스템
- 로컬 VCS: 로컬 컴퓨터 내에서 간단한 DB에 파일의 변경 사항을 기록하는 식으로 버전을 관리.
ex) RCS

- 중앙집중식 VCS: 파일을 저장하는 중앙 서버와 여기에서 파일을 가져오는 다수의 클라이언트.
ex) CVS, Subversion, Perforce

- 분산 VCS: 클라이언트가 저장소를 통째로 복사.
ex) Git, Mercurial, Bazaar, Darcs

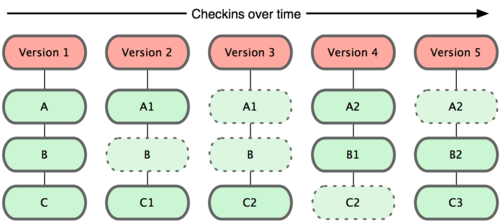
Git의 데이터는 파일의 스냅샷
- 파일이 달라지지 않으면 이전 버전의 링크만 저장.
- 특정 버전으로 되돌아 갈 때 빠르다.
2. Git 기초
Git 기본
- 거의 모든 명령이 로컬 파일과 데이터만 사용, 프로젝트의 모든 history가 local disk에 있기 때문.
- CLI (Command-line interface): 키보드를 통해 명령어를 입력하여 컴퓨터와 상호작용 하는 것.
- GUI (Graphical User Interface): 그래픽 요소로 컴퓨터와 상호작용 하는 것.

세 가지 상태
- Committed: 데이터가 로컬 DB에 안전하게 저장.
- Modified: 수정한 파일을 아직 로컬 DB에 commit 하지 않음.
- Staged: 수정한 파일을 곧 commit 할 것이라고 표시.
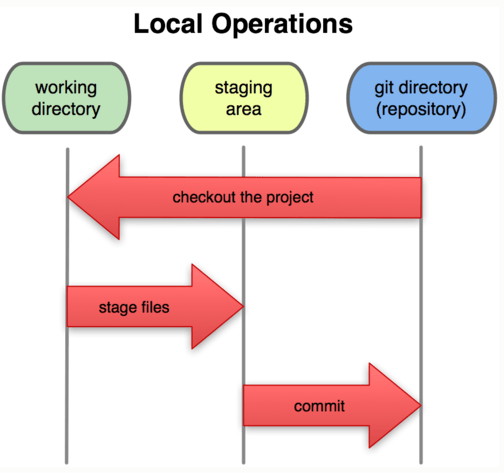
- working directory에서 파일을 수정.
- Staging Area에 파일을 Stage해서 commit할 스냅샷을 만듬.
- Staging Area에 있는 파일들을 commit해서 Git 디렉토리에 영구적인 스냅샷으로 저장.
3. Git 명령어
3-1. 로컬 저장소 생성 (일반 디렉토리를 git working tree로)
- git init : 원하는 디렉토리로 이동 후 "git init"
> cd Study
> git init
hint: Using 'master' as the name for the initial branch. This default branch name
hint: is subject to change. To configure the initial branch name to use in all
hint: of your new repositories, which will suppress this warning, call:
hint:
hint: 	git config --global init.defaultBranch <name>
hint:
hint: Names commonly chosen instead of 'master' are 'main', 'trunk' and
hint: 'development'. The just-created branch can be renamed via this command:
hint:
hint: 	git branch -m <name>
* Git 계정 설정 *
- git config --global user.email "you@example.com"
- git config --global user.name "Your name"
> git config --global user.email helloworld.v7@gmail.com
> git config --global user.name Joo-v7
3-2. 로컬 저장소를 원격 저장소에 연결.
- git remote add <remote-name(원격 저장소 별칭)> <git-address(레포지토리 URL)>
> git remote add Study https://github.com/NHN-NO-1/240829study.git
- git remote -v (연결된 원격 저장소 확인)
> git remote -v
Study	https://github.com/NHN-NO-1/240829study.git (fetch)
Study	https://github.com/NHN-NO-1/240829study.git (push)
- git remote rename <old-remote-name> <new-remote-name> (원격 저장소 이름 변경)
> git remote rename Study nhnStudy

> git remote --verbose
nhnStudy	https://github.com/NHN-NO-1/240829study.git (fetch)
nhnStudy	https://github.com/NHN-NO-1/240829study.git (push)
- git remote remove <remote-name> (원격 연결 삭제)
> git remote remove nhnStudy
3-3. Staging Area에 파일 올리기.
- git add <filename> (Staging Area에 파일 올리기)
- git status (상태 보기)
- git add . (한 번에 stage에 올리기), git add -all (동일한 코드)
> ls
git_test.java

> git add git_test.java // git add . (현재 디렉토리와 그 하위 모든 파일을 대상)

> git status

현재 브랜치 master

아직 커밋이 없습니다

커밋할 변경 사항:
  (스테이지 해제하려면 "git rm --cached <파일>..."을 사용하십시오)
	새 파일:       git_test.java
3-4. Staging Area 파일 Commit.
- git commit -m "커밋 메시지 작성"
- git commit --amend (커밋 메시지 수정) -> i로 에디터 모드, ESC로 명령 모드, wq 저장 및 종료
3-5. Commit한 파일을 Push해서 원격 저장소로 보내기
- git push <remote_name> <branch_name>
> git push git_test main
3-6. Clone : repository에서 코드 가져오기.
- git clone <git-address(레포지토리 URL)>
> git clone https://github.com/NHN-NO-1/240829study.git
3-7. 원격 저장소의 수정사항을 로컬로 가져오기 Pull & Fetch
- Pull : 원격 저장소에 변경 사항을 확인하고, 최신 데이터를 복사하여 로컬에 가져온다.
- git pull <remote_name> <branch_name>
> git pull git_test main
- Fetch : 원격 저장소의 변경 사항을 확인만 한다.
- git fetch <remote_name> (현재 위치한 branch의 최신 변겨 사항만 확인)
- git checkout <branch_name> (해당 branch_name으로 이동함)
> git fetch git_test
> git fetch --all // 모든 브랜치의 최신 이력 정보 확인
4. branch
branch는 가상의 작업 공간으로, commit 하면 Git은 commit 개체를 생성한다. Git의 branch는 이 commit을 가리키는 포인터다
4-1. branch 생성 및 조작
- git branch (현재 branch 상태 보기)
- git branch <branch_name> (branch_name으로 branch 생성)
- git branch -D <branch_name> (branch 삭제)
- git branch -m <현재_branch명> <new_branch명>
- git branch checkout <branch_name> (branch 변경)
- git checkout -b <new branch_name> <복사될 branch_name> (오른쪽 branch을 copy한 왼쪽 branch 생성)
> git branch // branch 확인
* master

> git branch Joo // branch "Joo" 생성
> git branch
  Joo
* master

> git branch -D Joo // branch "Joo" 삭제
Joo 브랜치 삭제 (과거 b67b912).

> git branch Joo // branch "Joo" 생성

> git branch -m Joo Ja // branch "Joo" -> "Ja"로 변경
> git branch
  Ja
* master

> git checkout Joo // branch를 "master" -> "Joo"로 변경
'Joo' 브랜치로 전환합니다

> git branch
* Joo
  master
4-2. branch "Joo"에서 작업한 내용을 "master"로 병합.
- git checkout master (병합할 branch로 이동)
- git merge Joo (병합)
4-3. Git Repository에 로컬 branch push
- git push <remote_name> <branch> (리포지토리에 branch 올리기)
> git push nhnStudy Joo
4-4. Github의 branch -> local로 가져오기
- git ls-remote <remote_url(원격 저장소 url)> (repository의 branch 조회)
- git ls-remote <remote_name> (repository의 branch 조회)
// 동일한 동작 수행
> git ls-remote https://github.com/NHN-NO-1/240829study.git
> git ls-remote nhnStudy
- git fetch <remote_name> <remote_branch_name>:<local에 저장될 branch_name>
(왼쪽의 remote branch를 오른쪽의 이름으로 local에 저장함)
> git fetch nhnStudy sugwan:test
remote: Enumerating objects: 5, done.
remote: Counting objects: 100% (5/5), done.
remote: Compressing objects: 100% (4/4), done.
remote: Total 4 (delta 0), reused 4 (delta 0), pack-reused 0 (from 0)
오브젝트 묶음 푸는 중: 100% (4/4), 1.17 KiB | 300.00 KiB/s, 완료.
https://github.com/NHN-NO-1/240829study URL에서
 * [새로운 브랜치]   sugwan     -> test
 * [새로운 브랜치]   sugwan     -> nhnStudy/sugwan

> git branch
* Joo
  test
- git pull <remote_repository_name> <remote에서 받아오고자 하는 branch_name>
> git branch
*  exercise-step3-entering-queue
  feature/JBGW08_017
  main

> git pull origin refs/heads/exercise-step4-customer-generator

> git branch
  exercise-step3-entering-queue
* exercise-step4-customer-generator
  feature/JBGW08_017
  main
* Git 사용할때 Fork를 사용하면 편하다 *
출처: